Creating a Session: Every Option Explained
How do I create a session? How do I create an event? How do I make a new session? How do I set up a session? What are all the options when I create a session? How do I host a session? What's the difference between quick setup and advanced setup? Walk me through creating a session. How do I create a pickleball event?
This is the full tour of creating a session in DailyPB. We'll start with the fastest way to get a session live, then go through every option in the Advanced Setup, one step at a time, so you know exactly what each setting does. Most options have a dedicated help article that goes deeper, and we link to it as we go.
To begin, click Create Session in the left menu.
Quick Setup vs. Advanced Setup
What's the difference between Quick Setup and Advanced Setup? Which setup should I use? Do I need Advanced Setup? How do I create a session fast? Can I add more options to my session later?
At the top of the Create Session window you'll see two choices:
- Quick Setup: just the basics: the type of session, its name, the venue, the start time, and how long it lasts. Pick this when you want a session live in under a minute and don't need pricing, privacy, skill levels, or recurring.
- Advanced Setup: the basics plus five more steps: privacy and participants, payments, skill levels and other questions, communication, and recurring. Pick this when you want to charge for the session, control who sees it, require a skill level, or make it repeat.
The rest of this guide walks through the Advanced Setup, which is the six-step version. The first step is identical to Quick Setup.
Step 1: Basic Info
What goes in the basic info of a session? How do I name my session? How do I set the date and time? How do I pick a venue? How long can a session be? How do I add a session description? How do I add a photo to my session?
This is the only required step. Fill these in and you already have enough to save a session.
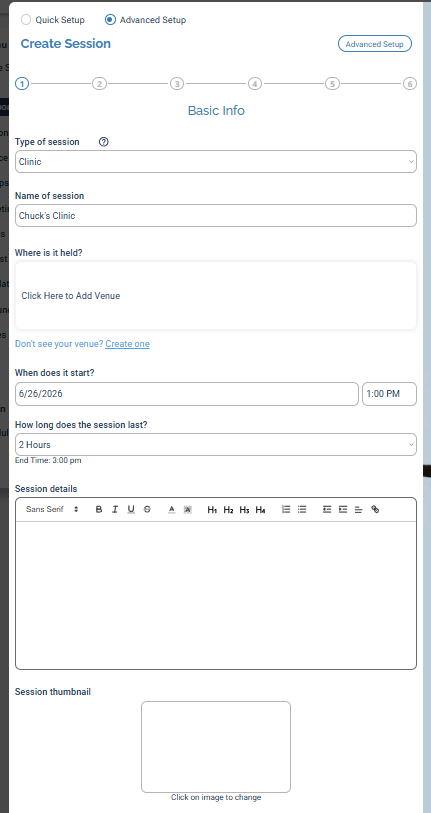
Step 1, Basic Info, is the only required step. Everything else is optional.
-
Type of session: what kind of session this is: Open Play, Intro Clinic, Drilling Group, Clinic, Tournament, Round Robin, League Play, Club Play, Fundraiser, Special Event, Private Session, Virtual Event, or Team Event. For most types this is a label that tells players the format. A few types change how the session works: Team Event has players join or form teams instead of signing up individually (see Team Events), and Virtual Event is for online sessions with no physical location (it skips the venue and shows to everyone, no matter where they are). For a plain-English rundown of all thirteen, see Session Types Explained.
-
Name of session: the title players see.
-
Where is it held?: click Click Here to Add Venue to open the Venue Finder, then search by name, address, or host and pick your venue. Don't see it? Use Create one to add a new venue.
🌐 Virtual EventIf you chose Virtual Event as the type, there's no venue to pick. DailyPB sets the location to a built-in "Virtual Event" placeholder for you and hides this picker.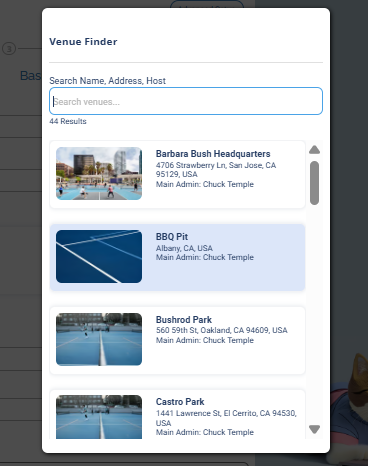
The Venue Finder lets you search your venues by name, address, or host.
To add a brand-new venue, Create one asks for just two fields, a Venue Name and a Venue Address, then adds and selects it for you.
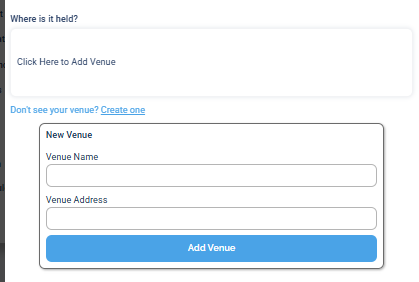
Creating a venue takes only a name and an address.
-
When does it start?: the date and start time.
-
How long does the session last?: a duration from 30 minutes up to 16 hours, or Until Sunset (DailyPB calculates the end time for you and shows it below).
-
Session details: a rich-text description (bold, lists, links, and more). This is where you tell players what to expect.
-
Session thumbnail: one image that does double duty. It's the large picture players see on the session page when they click in, and the small thumbnail on your session card when people are browsing a list of sessions. Because the same file is used both big and small, sizing it correctly matters. Click the image box to change it, then pick a stock image or upload your own. For the recommended size and supported file types, see How to Change the Event Image.
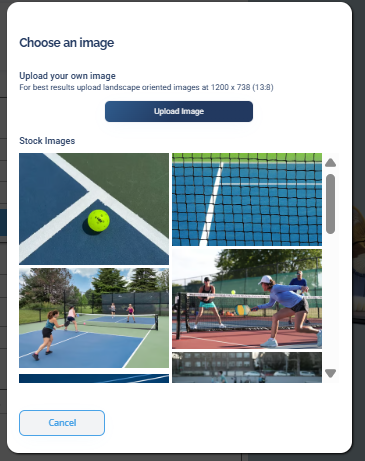
Choose a stock image or upload your own for the session thumbnail.
Step 2: Privacy & Participants
Who can see my session? How do I make my session private? How do I link my session to a group? How do I limit how many people can sign up? How do I add another host? How do I cap the number of players? How do I add my session to an interest list?
This step controls who can find the session and who runs it.
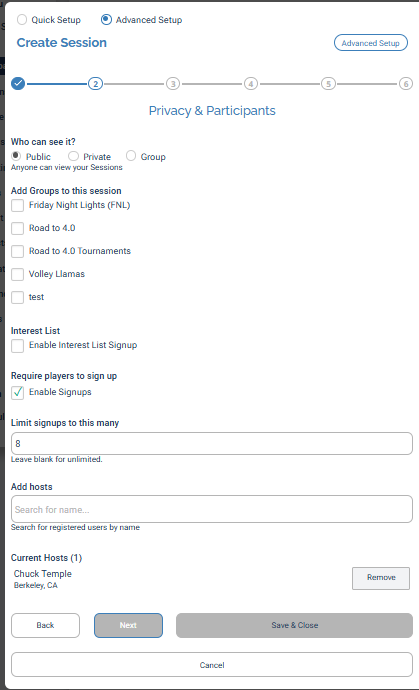
Step 2 sets visibility, groups, the signup limit, and who hosts the session.
- Who can see it?: Public (anyone can find it on the schedule), Private (direct link only), or Group (visible to members of a group you link it to). Full details in Privacy Settings and Can I Make a Session Private or Draft Mode?.
- Add Groups to this session: check any of your groups to link this session to them so it appears on those group pages. You can add the session to multiple groups. See Basic Group Info.
- Enable Interest List Signup: let people who can't attend join an interest list to hear about future sessions. Unlike groups, a session can be tied to only one interest list. See Interest Lists.
- Enable Signups: turn signups on (the default). Turn it off for an info-only listing with no roster. 🏆 Team Event sessionsIf you picked Team Event as the type back in Step 1, this step asks for a number of teams and a number of players per team instead of the usual individual-signup limit, since players join as teams rather than one by one. See Team Events.
- Limit signups to this many: the maximum number of players. Leave it blank for unlimited. When the session fills, a waitlist opens automatically (see Waitlists).
- Add hosts: you're listed as the host automatically. Search for registered users to add others. The host at the top of the list is the Main Host; the rest are Sub-Hosts. To not be a host at all (say you're just setting up open play for someone else), remove your name. To make someone else the main host, remove yourself, add the other host, then add yourself back so they sit on top. See Multiple Hosts.
Step 3: Payments
How do I charge for my session? How do I set a price? How do I collect money for my session? What's the difference between automatic and manual payments? How do I set a refund deadline? How do I make my session free? What payment methods can I accept?
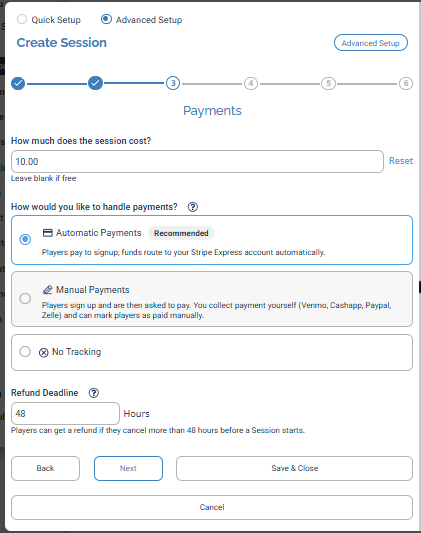
Step 3 sets the price, how you collect payment, and the refund deadline.
- How much does the session cost?: enter a price, or leave it blank to make the session free. As soon as you enter a price, the payment options below appear.
- How would you like to handle payments?
- Automatic Payments (recommended): players pay through Stripe when they sign up, and the money routes to your Stripe account automatically. No payment, no signup. See Automatic Payments.
- Manual Payments: players sign up first and pay you directly (Venmo, Cashapp, Paypal, Zelle, cash); you mark them paid by hand. See Manual Payments.
- No Tracking: collect a fee but don't track who has paid inside DailyPB.
- Not sure which to pick? See Manual vs. Automatic Payment Comparison.
- Refund Deadline: how many hours before the session a player can still cancel for a refund (default 48 hours). See Refunds.
- What types of payment will you accept?: choose which methods you'll take, such as Venmo, PayPal, Cash App, Zelle, or cash. This only applies to manual payments, since these are the ways players pay you directly. (With automatic payments, everyone pays the same way through Stripe.) See How to Add Alternative Payment Methods.
Step 4: Skill Levels & Other Questions
How do I set a skill level for my session? How do I require players to enter their rating? How do I set up DUPR for my session? How do I add custom questions to my signup form? How do I ask players questions when they sign up? What is DUPR Game Mode?
This step controls who can sign up and what you ask them.
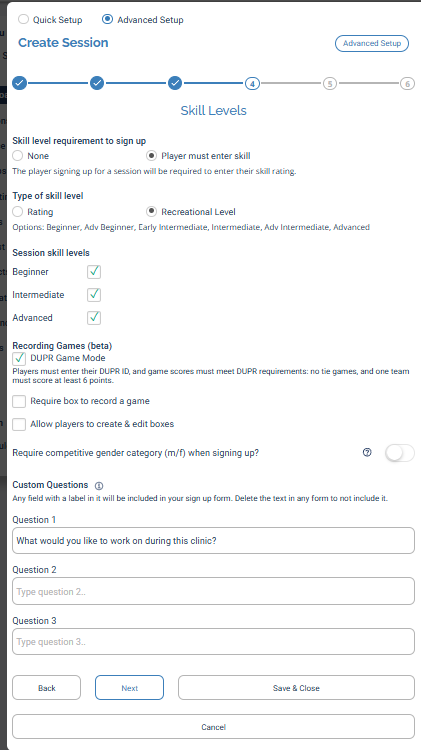
Step 4 sets skill requirements, the levels this session is for, and any custom signup questions.
- Skill level requirement to sign up: this has two parts. First choose None or Player must enter skill. If you pick Player must enter skill, a Type of skill level option appears: choose Rating (a number like
3.7) or Recreational Level (a category like Advanced Beginner). Players then have to enter that before they can finish signing up. See Skill Level / Rating Requirements. - Session skill levels: check Beginner, Intermediate, and/or Advanced to show the level this session is meant for. You can select more than one.
- Recording Games:
- DUPR Game Mode: players must enter their DUPR ID, and recorded scores must meet DUPR's rules (no ties, one team scores at least 6). See DUPR Games.
- Require box to record a game and Allow players to create & edit boxes: options for box-based score recording.
- Require competitive gender category (m/f) when signing up?: ask players for a competitive gender category (used for team and competitive formats).
- Custom Questions: up to three extra questions on your signup form. Any question with text in it is included; clear the text to leave a question out. See Custom Fields.
Step 5: Communication
How do I send reminders for my session? How do I email people who sign up? How do I set up automatic emails? What is a session template? How do I send a thank-you email after a session? How do I turn off reminders?
This step sets the automatic emails around your session.
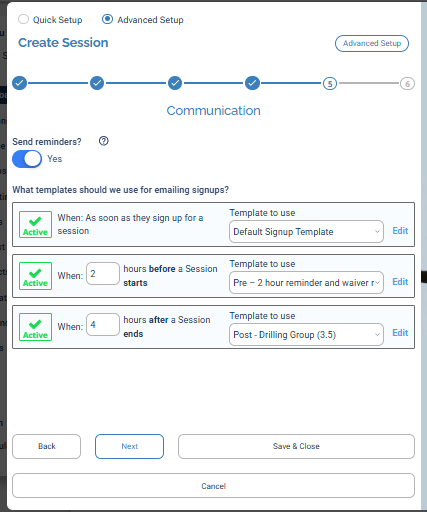
Step 5 controls reminders and the templates emailed when players sign up, before the session, and after.
- Send reminders?: keep this on (the default) to send automatic 2-hour and 24-hour reminders to attendees and waitlisters. See 2 & 24 Hour Reminders.
- What templates should we use for emailing signups?: pick (and Edit) an email template for each of three moments:
- As soon as they sign up.
- A set number of hours before the session starts.
- A set number of hours after the session ends.
- Learn how to build and link these in Email Templates.
Step 6: Recurring
How do I make my session repeat? How do I make a weekly session? How do I set up a recurring session? How do I make a session repeat every week? How do I stop a recurring session on a date? Can my session go on forever?
The last step decides whether this is a one-time session or a repeating one.
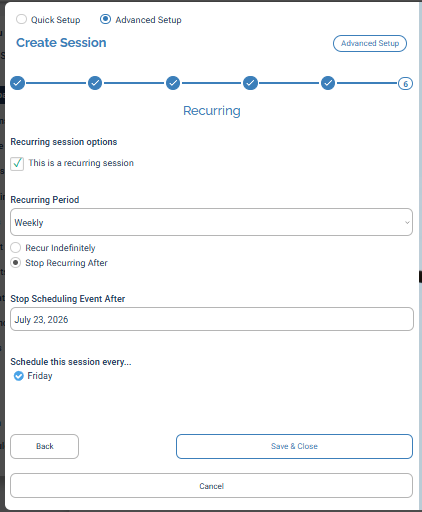
Step 6 turns a session into a weekly repeating one.
Recurring works best for sessions that stay the same week to week, like open play. For signup-style sessions where the details often change (different price, skill level, or format each time), you usually won't use recurring, because every week's session would copy the same setup.
Leave This is a recurring session unchecked for a one-off. Check it and your session repeats weekly (the only recurring period DailyPB supports) on the day of the week from your start date. You then have just two choices for how long it keeps going:
- Recur Indefinitely: it repeats every week with no end, and DailyPB keeps generating future sessions for you.
- Stop Recurring After: it repeats weekly only until an end date you pick.
Finishing up
How do I save my session? How do I finish creating my session? How do I publish my session? Can I edit my session after I create it? How do I go back a step when creating a session?
At the bottom of every step you have:
- Back and Next: move between steps.
- Save & Close: create the session with everything you've entered so far.
- Cancel: discard and close without creating anything.